New SMT component packages including smaller SMD passives and chip-scale semiconductors present increasingly tough challenges that call for greater system resolution. On the other hand, established component sizes remain in use. In the automotive sector, in particular, large components like some types of connectors support enduring industry standards that are retained from generation to generation. Hence the range and variety of component sizes that the machine must handle is increasing.
Multi-layer boards are more affordable than ever to produce, and their use is increasing as designers utilize all viable measures to miniaturize product dimensions. Surface-mount components are increasingly closely spaced, presenting greater lighting challenges such as shadowing.
Also, as assembly complexity increases; each board presents more features that must be inspected. To address this, inspection algorithms can be improved and optimised to take advantage of the performance gains that come with the latest processing engines.

The infusion of AI into these processing engines is an exciting new development that can drastically enhance and accelerate anomaly detection.
In addition, enhancements that make AOI equipment easier to use are important to help increase program accuracy and productivity.
Overcoming historical AOI hurdles
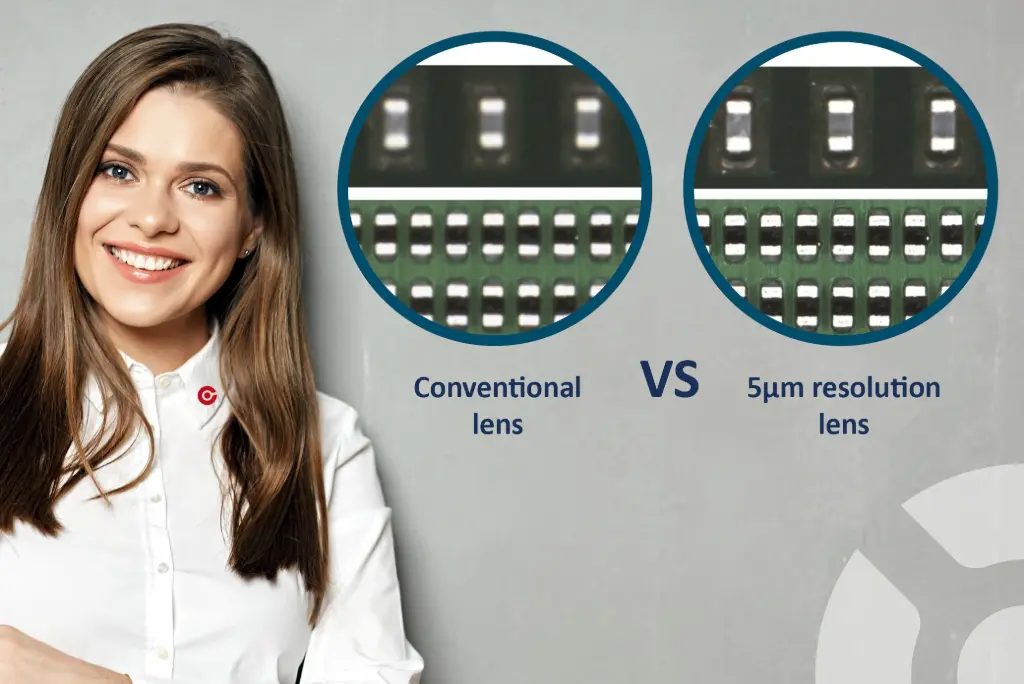
 Figure 1. The high-resolution lens enables minute details to be captured clearly.
To ensure that image quality remains sharp as component sizes become ever smaller, it is important to ensure that the lighting, camera resolution, and the lens characteristics are optimised. In the latest YRi-V 3D AOI system, Yamaha combines a 12 Mp camera with an enhanced, 5µm, lens option (figure 1) in addition to 12 µm and 7 µm lenses.
When inspecting surface-mount assemblies at high speed, the high-resolution lens facilitates inspection of the smallest 0201 SMD parts. It works in conjunction with the YRi-V’s new coaxial lighting system, which is specially designed to help find minute defects.
This coaxial light can be configured for use in automated routines down to the level of a single inspection step, enabling the YRi-V to identify defects such as scratches and cracks in SMD like wafer-level chip-scale packages (WLCSPs) that have a glossy, reflective surface.
Accompanying the increased 5 µm lens resolution, the image-processing subsystem is uprated using the latest-generation graphics processing unit (GPU) chips. This has accelerated the inspection cycle time by 60 - 100 %. The combined effect of the enhanced lens and processing technology deliver a simultaneous increase in inspection resolution and throughput.
Smaller component sizes, however, are merely one aspect of the challenges presented by the latest board designs. As board designers take advantage of affordable multi-layer fabrication to pack more functionality in PCBs that have smaller outside dimensions, components are becoming more closely spaced on the board surface with successive new product generations.
Although multi-layer boards create exciting new opportunities for designers, they also present challenges for inspection. In particular, small components such as SMD chips can cause blind spots when placed adjacent to larger parts, preventing a clear view of the larger component’s I/O pins and their associated solder pads.
Conversely, the larger parts can cast shadows over smaller components such as SMD chips placed in between, preventing assessment of the soldered terminations and any identification and polarity markings on the surface.
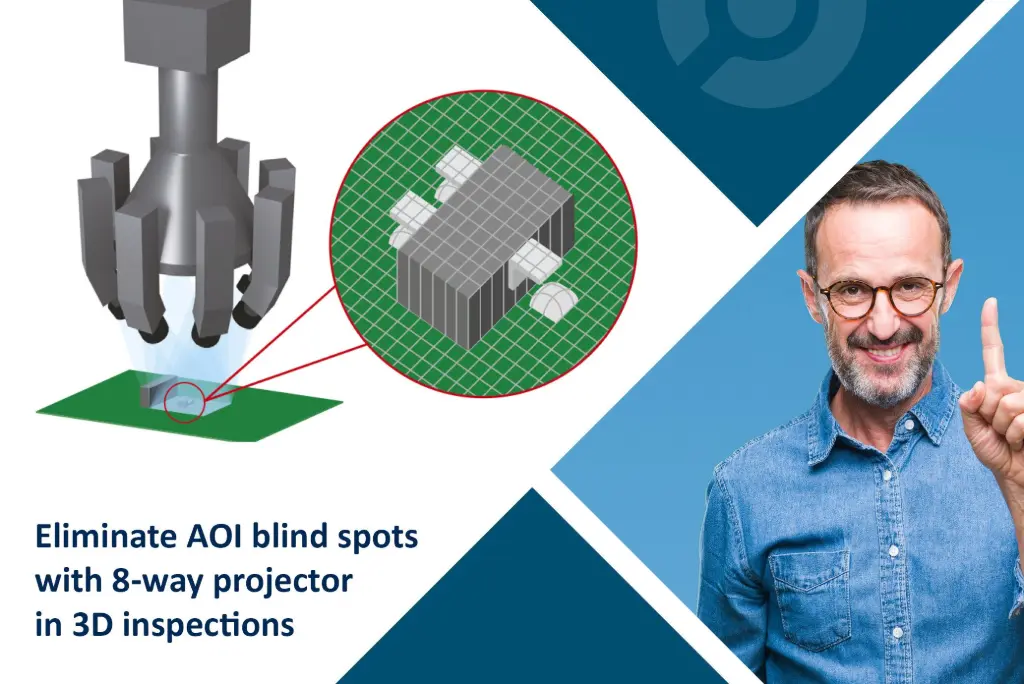
New features includes the 8-way projector (figure 2), available with Yamaha’s YRi-V system, now effectively overcome these issues. The maximum measurement distance is also extended, to 25 mm.
The enhanced projector prevents shadowing by ensuring uniform lighting of all features in the field of view. The extended measurement capability allows close-up inspection while at the same time handling a broad range of component sizes from the smallest to the largest.

Figure 2. Enhanced lighting prevents shadowing and blind spots.
AOI enhanced with artificial intelligence

While the machine’s next-generation graphics processing performance has enabled faster image processing and defect detection, artificial intelligence (AI), or machine learning, is ready to bring game-changing new capabilities to AOI - as it is with many other aspects of industrial and consumer technology.
Leading the trend, Yamaha’s YRi-V system has introduced important new AI-based skills to help simplify setting up and running the equipment. These include automatic component library matching, which uses deep learning to identify component types from images and so enable the optimum component library to be selected automatically.
In addition, AI is used to assist 3D measurement of components to generate data for parts that are not found in any existing library. Finally, AI is used to analyze captured images and assist with pass/fail judgement. This combines an element of machine-based certainty with the flexibility of human visual inspection, resulting in fast, accurate, and repeatable pass/fail judgement.
4-angled AOI inspection and algorithms
Historically, soldering defects are the toughest for AOI systems to analyze.
Some - such as head-in-pillow defects that arise when solder fails to wet-out against the component termination - are notoriously hard to detect using conventional equipment and approaches.
Solder bridges, also, can be difficult to identify with certainty.
Yamaha’s 4-angle inspection cameras have helped to overcome these challenges by capturing images from oblique angles, which enables the system to capture an all-round image of each inspection site.
The YRi-V upgrades these cameras with 20Mpixel resolution to capture finer details. In combination with the camera upgrade, enhanced 4D inspection algorithms leverage the greater image information to increase detection of problems like bridging and head-in-pillow.
YAMAHA boosts AOI software & programs
Some AOI systems deliver their optimum performance when installed inline with other equipment running on the same software platform. A more open approach, as adopted by Yamaha, allows users to unleash the full power of their AOI system when working with any type of equipment in the line. In particular, rapid program generation is possible using Yamaha’s YSUP software, which is available on an open and license-free basis.
The full-featured YSUP software can convert inspection data directly from CAD/CAM or YGX and also supports Gerber data as standard.
Also, the YSUP functionality in YRi-V offline programming software can create AOI programs from ODB++ data without needing a YGX file. If the PCB silk screen is present in the ODB++ data, it can be imported as a simplified image to help position new components using the offline programming station.
This can save programmers needing to take over the factory’s AOI system to scan the PCB and create a template image, and so avoids interrupting normal production.

The software automatically generates and displays virtual images of the production PCB without requiring special skills. Additional automated features include detection of any through-hole parts, with the ability to generate suitable inspection data. There are also new features to support data tuning, including automatic detection of inspection areas based on component shapes and pad positions. This enhances convenience and eliminates any need for inspection frames. In addition, the software automatically determines settings for lighting parameters to ensure optimal lighting while minimizing trial and error and reliance on user experience. There is also automatic position correction, based on the amount of component misalignment, which helps minimize operator intervention. Together, these functions can shorten data tuning times by up to 50%.
YAMAHA boosts AOI accuracy with more of everything
Conclusion
Historically, soldering defects are the toughest for AOI systems to analyze.
Some – such as head-in-pillow defects that arise when solder fails to wet-out against the component termination - are notoriously hard to detect using conventional equipment and approaches. Solder bridges, also, can be difficult to identify with certainty.
Yamaha’s 4-angle inspection cameras have helped to overcome these challenges by capturing images from oblique angles, which enables the system to capture an all-round image of each inspection site. The YRi-V upgrades these cameras with 20 Mpixel resolution to capture finer details. In combination with the camera upgrade, enhanced 4D inspection algorithms leverage the greater image information to increase detection of problems like bridging and head-in-pillow.